
Overview
SMART SUN TRACKING SYSTEM USING SOLAR PANEL
Abstract
Despite having abundant solar energy, there is no effective use of it. With this project, we are going to make a sun-tracking system that tracks solar energy with the help of solar panels and an LDR sensor. The LDR sensor is used to track the intensity of light. When light falls on the LDR sensor, it calculates its intensity and sets the solar panel according to the intensity with the help of a servo motor. Compared to existing systems where solar panels were static and were not able to fully utilize and absorb sunlight, the proposed system helps to absorb maximum sunlight due to an imposed feedback mechanism.Introduction
The energy produced by the sun in the form of heat and light energy is called solar energy. Solar energy is one of the vast, renewable(inexhaustible), and clean resources. It can be converted into thermal and electrical forms. A solar panel is used to convert solar energy (which is composed of energy particles known as photons) into electrical energy. Solar panels are made up of solar cells, which are composed of silicon, phosphorus, and boron layers. A photon is absorbed by the solar panel and when photons strike the solar panel, electrons would be free from their atomic orbits due to the electric field generated, perhaps forming a directional current. This process is called the photovoltaic effect. There are vast applications for solar panels. From households to industries, solar panels can be used as an alternative and solar energy can be well utilized. A few applications of solar panels are solar distillation, solar pumping, solar water heating, solar lamp lights, solar furnaces, solar electric power generation, etc.Components Required
Hardware Requirements- Arduino Uno : Arduino Uno is a microcontroller from the Arduino Family. It was developed by Arduino. cc and is based on the Microchip ATmega328P microcontroller. Uno has 20 I/O pins, 6 are analog pins and 14 are digital pins.
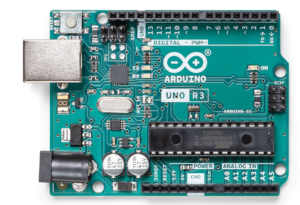 For more details, pinout and datasheet, you can visit : https://docs.arduino.cc/hardware/uno-rev3
- 2xServo motor: it is a tiny and lightweight server motor with high output power
- 2xLDR sensor: LDRs (light-dependent resistors) are used to detect light levels, it is Photoresistors.
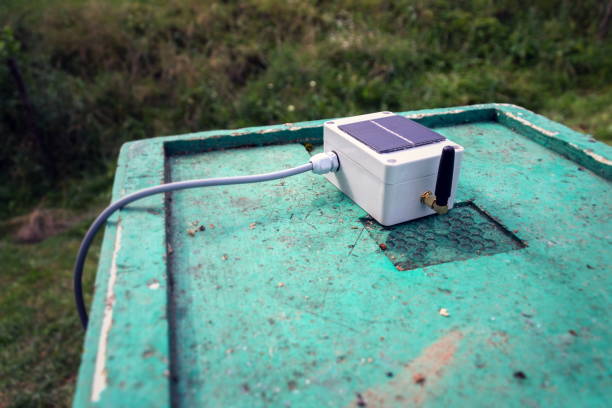
- Solar panel: it is a device that converts solar energy to direct current.
- Arduino Ide : Arduino IDE (Integrated development environment) is software that is used to dump the program into boards. Arduino- IDE's major use is to build electronics-related projects. Arduino is an open-source platform simple and easy-to-understand platform for coding.
Block diagram
In the following block diagram LDR sensors are the input device. Arduino UNO is the controller. Servo motors and solar panels are the output devices.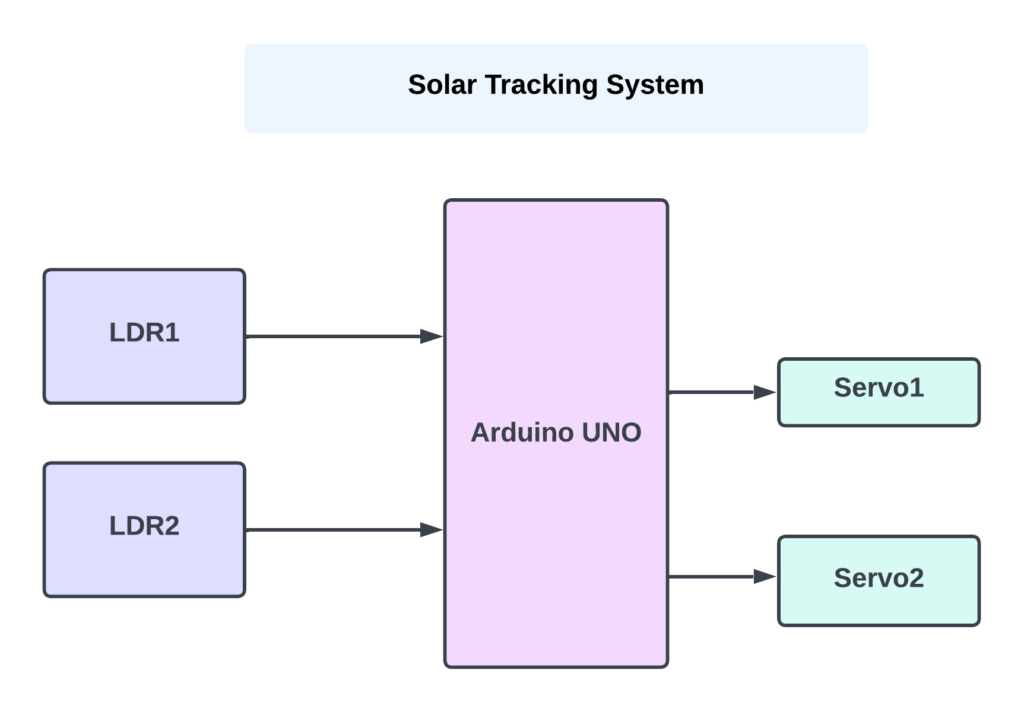
Flow Chart
A flowchart is a diagram that shows a process' individual steps in their proper order, similarly, the following flowchart tells about the steps involved in the project and the sequential flow of the code also. So as it starts, first, LDR detects the intensity of sunlight. As per the LDR readings, the Arduino sends the signal to servos to adjust the direction of the solar panel.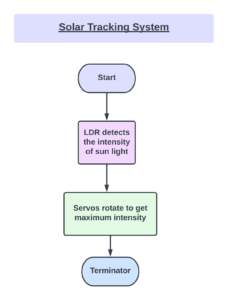 *website used to make Flow Chart and Block Diagram : https://www.lucidchart.com/pages/
Pin Wiring
LDR1 LDR1 has 2 pins OUT and Ground. We connect the OUT pin to the A0 pin of Arduino Uno and Ground to GND.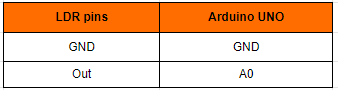 LDR2
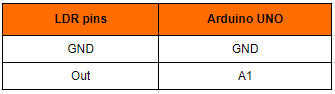
LDR2 has 2 pins OUT and Ground. We connect the OUT pin to the A1 pin of Arduino Uno and Ground to GND.
LDR2
LDR2 has 2 pins OUT and Ground. We connect the OUT pin to the A1 pin of Arduino Uno and Ground to GND.
 Servo1
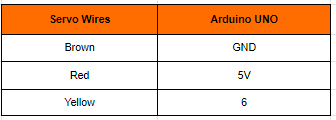
 has 3 wires Brown, Red, and Yellow. where Brown is connected to the GND of the Arduino Uno. Red is connected to the VIN of the Arduino Uno. Yellow is connected to the 7th pin of the Arduino Uno.
Servo1
Servo1 has 3 wires Brown, Red, and Yellow. where Brown is connected to the GND of the Arduino Uno. Red is connected to the VIN of the Arduino Uno. Yellow is connected to the 7th pin of the Arduino Uno.
Circuit diagram
Follow the below circuit diagram to understand the connection made to different devices.
Note: Make sure to take proper precautions while connecting the components.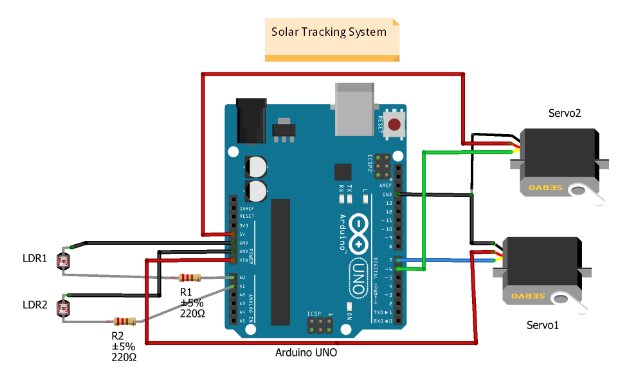
Working
When the circuit is powered on after uploading the code, the LDR reads some values according to that servos will be rotated at the maximum intensity of LDR. by this process the solar panel will be adjusted to the direction of the sun.Conclusion
Hence, we developed a smart sun-tracking system using solar panels. by this system the solar panels will work with maximum efficiency.Working Code
#include <Servo.h>   //definiamo i servomotori orizzontale e verticale
Servo servohori;
int servoh = 0;
int servohLimitHigh = 160;
int servohLimitLow = 60;
Servo servoverti;
int servov = 0;
int servovLimitHigh = 160;
int servovLimitLow = 60;
//Pin fotoresistenze
int ldrtopl = 2; //top left
int ldrtopr = 1; //top right
int ldrbotl = 3; // bottom left
int ldrbotr = 0; // bottom right
 void setup ()
 {
  servohori.attach(10);
  servohori.write(60);
  servoverti.attach(9);
  servoverti.write(60);
  Serial.begin(9600);
  delay(500);
 }
void loop()
{
  servoh = servohori.read();
  servov = servoverti.read();
  //Valore Analogico delle fotoresistenza
  int topl = analogRead(ldrtopl);
  int topr = analogRead(ldrtopr);
  int botl = analogRead(ldrbotl);
  int botr = analogRead(ldrbotr);
  // Calcoliamo una Media
  int avgtop = (topl + topr) ; //average of top
  int avgbot = (botl + botr) ; //average of bottom
  int avgleft = (topl + botl) ; //average of left
  int avgright = (topr + botr) ; //average of right
  if (avgtop < avgbot)
  {
    servoverti.write(servov +1);
    if (servov > servovLimitHigh)
     {
      servov = servovLimitHigh;
     }
    delay(10);
  }
  else if (avgbot < avgtop)
  {
    servoverti.write(servov -1);
    if (servov < servovLimitLow)
  {
    servov = servovLimitLow;
  }
    delay(10);
  }
  else
  {
    servoverti.write(servov);
  }
  if (avgleft > avgright)
  {
    servohori.write(servoh +1);
    if (servoh > servohLimitHigh)
    {
    servoh = servohLimitHigh;
    }
    delay(10);
  }
  else if (avgright > avgleft)
  {
    servohori.write(servoh -1);
    if (servoh < servohLimitLow)
     {
     servoh = servohLimitLow;
     }
    delay(10);
  }
  else
  {
    servohori.write(servoh);
  }
  delay(50);
}


Need the source code or help?
Contact us for model weights, datasets, or guidance on running this project.