
Overview
Fire Detection and control System

Abstract
The occurrence of fires is a serious issue in homes, businesses, restaurants, etc. The misuse of electricity is the main factor in fire incidents. Many people don't know how to use energy properly and safely. Since short circuits can occur at any time, it is crucial to carry out routine inspections in order to avoid them. Another common cause of fire incidents that may be directly attributed to user negligence or human error is gas leakage. Accidental fires might also result from improper handling of combustible materials. In order to prevent the loss of lives and damage to property, it requires the highest level of security and control. The Arduino-based fire alarm detection and control system is suggested since an automatic fire alarm detector is one of the preventive measures to lower risk. There are many pricey and contemporary fire alarms on the market, however we have created a straightforward fire alarm with a buzzer, light, and flame sensor. This fire alarm's main objective is to find the fire and warn neighboring residents as soon as possible by turning on the buzzer and led. The buzzer and led of this fire alarm are turned on when there is a fire. This tool can improve in fast fire detection and prevent minimize damage from happeningIntroduction
One of the disasters that cannot be expected is fire. Fire occurrences are dangerous and conflict with people's lives and means of survival. Fire is seen as a type of catastrophe. A disaster is defined as a series of attacks that harm and disrupt people's lives and non-natural, or human factors, resulting in deaths, ecological damage, property loss, and emotional impact. According to government data, 7,899 fire incidents took place in 2020, while 7,149 cases were reported in 2021 in most of the states of India. As fire accidents continue growing one needs to be more careful about them and this project can help to reduce the risk of fire accidents and save the lives of people much economical damage to happen. This device automatically detects the fire and gives a warning by turning on the buzzer and Led Light. There are different ways this device can be converted into like a bell, or voice evacuation message which will warm and intimate the people nearby. There are many applications of fire alarms like fire alarms in hotels and schools. There are many advantages of this project, it is not expensive, reliable, easy to build, easy to modify as per the requirement, has an early warning, and has low power consumption. But can detect the fire at near range only.Components Required
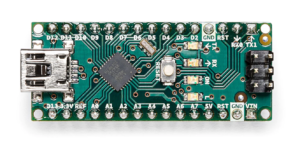
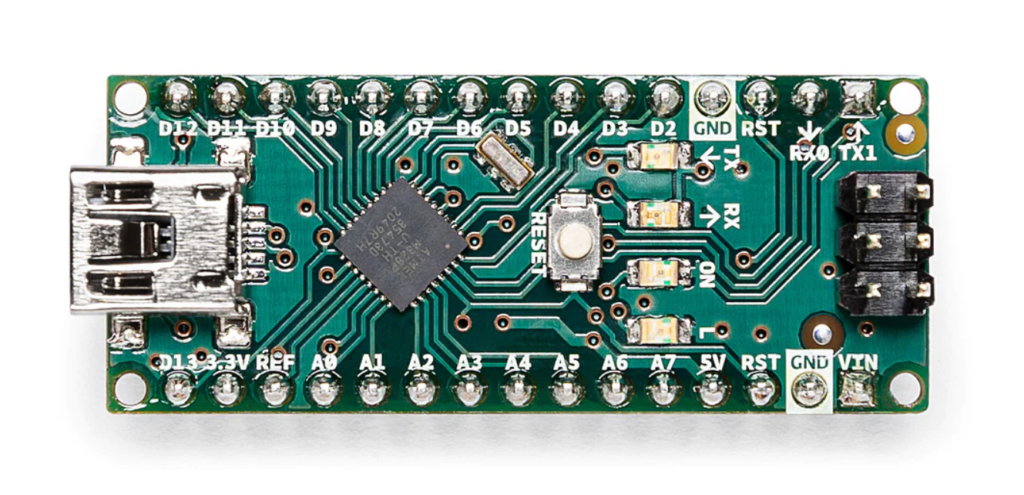
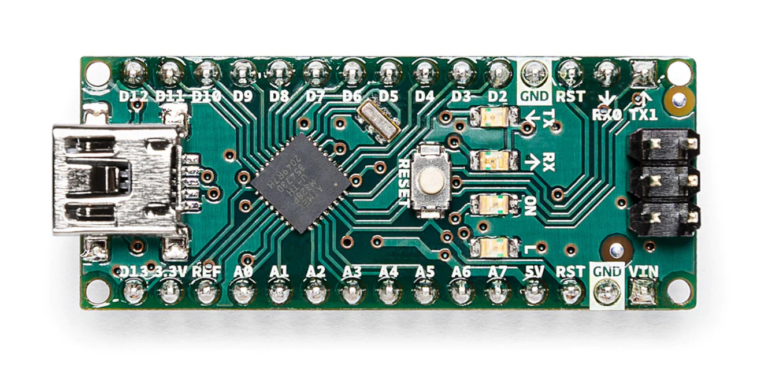
Hardware Requirements- Arduino Uno :Arduino Nano is a microcontroller from Arduino Family, a friendly board based on the ATmega328. Nano has 22 Input / Output pins. 14 are digital pins and 8 are analog pins.
 For more details, pinout and datasheet, you can visit : https://docs.arduino.cc/hardware/uno-rev3
- Buzzer : The buzzer is an electric-sounding device that generates sounds.
- LED: A light-emitting diode (LED) is a semiconductor light source that emits light when current flows through it.
- Flame sensor: -The flame sensor is used detector used to detect fire or flame.
- Arduino Ide : Arduino IDE (Integrated development environment) is software that is used to dump the program into boards. Arduino- IDE's primary use is to build electronics-related projects. Arduino is an open-source platform simple and easy-to-understand platform for coding.
Block diagram
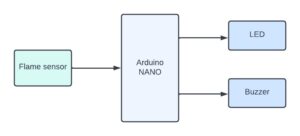
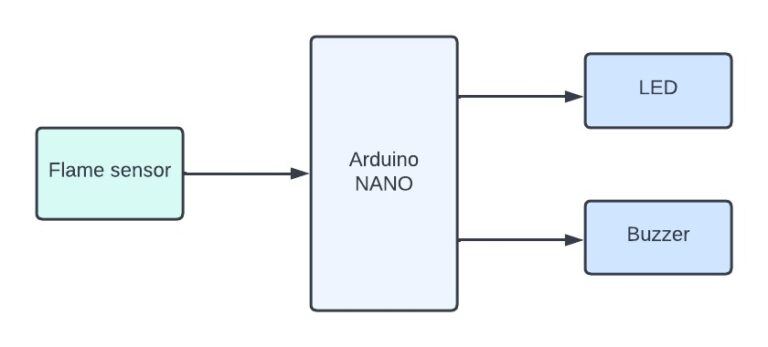
The following block diagram flame sensor is an input device that sends data to Arduino. Buzzer and led are output devices that receive information from the Arduino.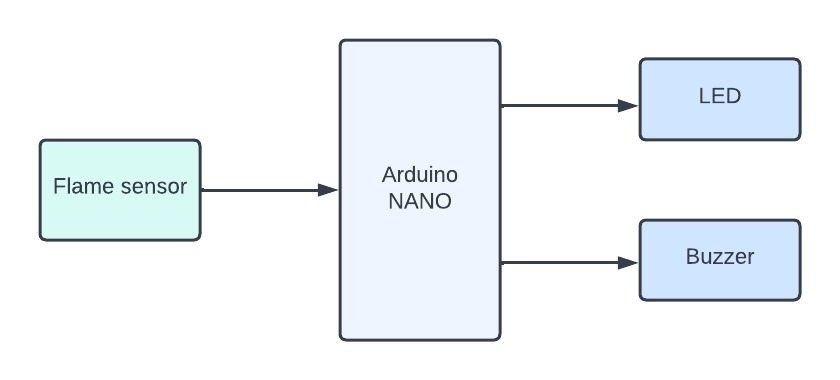
Flow Chart
A flowchart is a diagram that shows a process’s steps in proper order. Similarly, the following flowchart talks about the steps involved in the project and the sequential flow of the code also. So, as it starts, first, the FLAME sensor detects the presence of fire, and If the sensor detects the fire then the led and buzzer get activated. Else the buzzer and led are turned off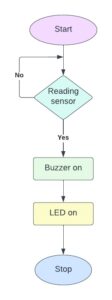 *website used to make Flow Chart and Block Diagram : https://www.lucidchart.com/pages/
Pin Connections
Flame Sensor The flame sensor has 4 pins The following pin connection is about the connection of the flame sensor with Arduino Uno. The flame sensor has 4 pins, the MQ-3 is connected to 5v of Arduino Uno, the Digital pin is connected to D11, the analog pin is connected to A0 and the Ground (GND) is connected to GND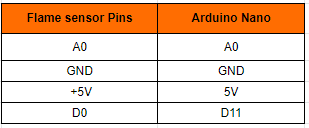 Buzzer
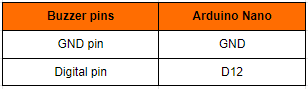
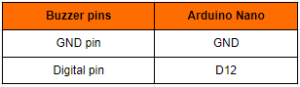
 has 2 pins
The below pin connection is about the connection of the buzzer with Arduino Uno. The buzzer has 2 pins, the Buzzer is connected to D8 of Arduino UNO. The other pin is connected to the D12 of Arduino nano.
Buzzer
Buzzer has 2 pins
The below pin connection is about the connection of the buzzer with Arduino Uno. The buzzer has 2 pins, the Buzzer is connected to D8 of Arduino UNO. The other pin is connected to the D12 of Arduino nano.
 LED
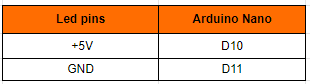
The pin connection is about the connection of the led with the Arduino UNO. LED has 2 pins, the LED is connected to d10 of Arduino UNO. And the other pin is connected to D11
LED
The pin connection is about the connection of the led with the Arduino UNO. LED has 2 pins, the LED is connected to d10 of Arduino UNO. And the other pin is connected to D11
Circuit diagram
Follow the below circuit diagram to understand the connection made to different devices. Note: Make sure to take proper precautions while connecting the components.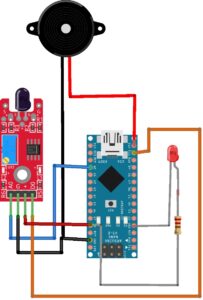
Working
The next step after setting up the connection is to upload code to Arduino Nano and power it. When the system is turned on, Arduino continues to watch for flame if the flame gets detected then led and a buzzer will get activated else it remains off.Conclusion
Thus we conclude fire alarms are used for safety purposes. This will help to avoid accidents and save the lives of people even helping avoid damage caused to property. The main objective of this project is to provide a reasonable price that can help everyone.Working Code
#define buzzerPin 12                      //buzzer pin connecetd to pin 11 of Arduino Nano
#define LED 2                             //LED pin connecetd to pin 2 of Arduino Nano
#define flamePin 11                       //falme sensor  pin conneceted to pin 2 of Arduino Nano
#define flamepinanalog A0                 //falme sensor pin connected to analog pin A0 of arduino nano
 void setup()
{
  pinMode(buzzerPin, OUTPUT);            //Set buzzer as OUTPUT device
  pinMode(LED,OUTPUT);                   //Set LED as OUTPUT device
  pinMode(flamePin, INPUT);              //set Flamesensor as INPUT device
  Serial.begin(9600);                    // Initiate a serial communication with baud rate of 9600
}
void loop() {
 int Flame = digitalRead(flamePin);
  if (Flame== LOW) {                      //if Fire is detected
    Serial.println("Fire is Detected");
    digitalWrite(buzzerPin, HIGH);       // turns the buzzer on
    digitalWrite(LED, HIGH);             // turns the LED on
     }
   else
  {
    Serial.println("No Fire is Detected");
    digitalWrite(buzzerPin, LOW);        // turns the buzzer off
    digitalWrite(LED,LOW);               // turns the LED off
  }
}


Need the source code or help?
Contact us for model weights, datasets, or guidance on running this project.