How many of us loved watching the show “Shaka Laka Bom Bom”. The magic pencil with him. Whatever thing the boy drew turned into a real thing. We will do something like that but in a virtual mode. We trained the machine to identify the sketches of airplane, ant, apple, axe, banana, bed, bench, bicycle, book and bus. You draw a sketch like one of these objects and our program will return the prediction along with the real world photo of the same object.
Code Description & Execution
Algorithm Description
As we all are aware of the fact, how deep learning and transfer learning is revolutionizing the world with its immense capability of handling any kind of data and learning so efficiently. So, similarly we have applied the same concept by picking a deep learning model i.e., Convolutional neural network which basically work son the principle of having filters. Each convolutional layer has some specific filters to identify and extract the features from the input image and learn it and transfer it to other layers for further processing. We can have as many filters as possible in the convolutional layer depending on the data we are dealing on. Filter are nothing but feature detectors in the input data. Along with the convolutional layer we also have other layers which does further pre-processing such as Maxpooling, Activation function, Batch Normalization and dropout layer. These all contribute to the CNN model creation and along with the flatten and output layer. The reason we do flattening is to feed the output of the CNN model to the dense layer which gives us the probability of the predicted value.
We used transfer learning to build our model. We used VGG-16 to achieve this feat. This is a very useful model to use for classification and has performed exceedingly well in the Imagenet competition. It takes input with the dimensions of 224,224,3.
So, before execution we have some pre-requisites that we need to download or install i.e., anaconda environment, python and a code editor.
Anaconda: Anaconda is like a package of libraries and offers a great deal of information which allows a data engineer to create multiple environments and install required libraries easy and neat.
If you already have anaconda and want to check on how to create anaconda environment, refer to this article set up jupyter notebook. You can skip the article if you have knowledge of installing anaconda, setting up environment and installing requirements.txt
1. Install necessary libraries from requirements.txt file provided.
2. Go to the directory where your requirement.txt file is present.
CD<>. E.g,If my file is in d drive, then
CD D:
CD D:\License-Plate-Recognition-main #CHANGE PATH AS PER YOUR PROJECT, THIS IS JUST AN EXAMPLE
If your project is in c drive, you can ignore step 1 and go with step 2.
Eg. cd C:\Users\Hi\License-Plate-Recognition-main #CHANGE PATH AS PER YOUR PROJECT, THIS IS JUST AN EXAMPLE
3. Run command pip install -r requirements.txt or conda install requirements.txt
(Requirements.txt is a text file consisting of all the necessary libraries required for executing this python file. If it gives any error while installing libraries, you might need to install them individually.)
All the necessary files will get downloaded. To run the code, open anaconda prompt. Go to virtual environment if created or operate from the base itself and start jupyter notebook, open folder where your code is present.
If you want to build your own model for detection, you can go through “sketch_to_image.ipynb”. You can refer to other notebooks as well where we tried different objects for predictions.
Data Description
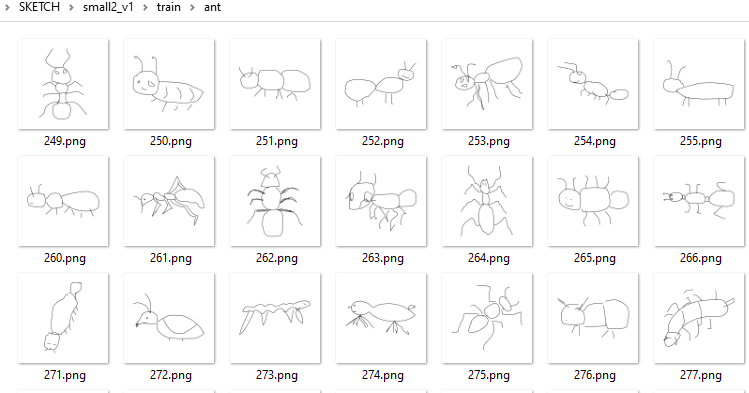
We downloaded the dataset from kaggle. The dataset has been provided in the zip file along with the code. It contains sketch images of 80 objects. From this dataset we took images of the 10 objects mentioned above and used for training our model.
Sample images from the dataset.
Results
Issues Faced
Ensure you have all libraries installed.
Give correct paths wherever necessary.
Make sure you have the appropriate versions of tensorflow and keras.