

ARDUINO-BASED FINGERPRINT DOOR LOCKING SYSTEM
Abstract
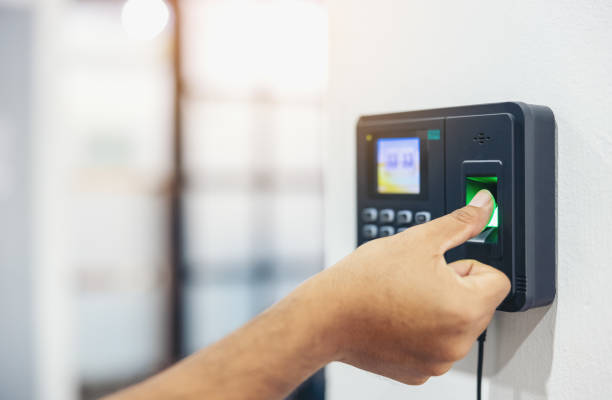
The main objective of this fingerprint door locking system project is to provide a sense of safety and security by making a door-locking system based on fingerprint authentication. In this system, a simple Arduino nano is used as a microcontroller which is interfaced with a fingerprint sensor, relay, solenoid lock, and LCD. When the user keeps the finger on the fingerprint sensor, it will verify whether the fingerprint is authentic or not. If the fingerprint is authentic then the door lock will be opened with the help of a relay and a message will be popping on the LCD stating “fingerprint verified welcome back home”. If the fingerprint is not authentic, then the buzzer will get activated and a message will be displayed stating “unauthorised fingerprint”. This system is very useful for security purposes. In the existing system, there was a traditional approach to locking the door, and in further advancements, there was a pattern-based door locking system, but in the proposed system there is no traditional approach, and from this one can feel safe and secure as the probability of theft is reduced.
Introduction
Security and protection systems are designed to protect and guard assets. This fingerprint door locking system can be used in a variety of settings, including homes, offices, colleges, and industries, to allow a person into a room fingerprint sensor using fingerprints as biometric authentication. In this modern era, fingerprint authentication has become common as there are many applications such as: in mobile phones (for security purposes), in colleges(for biometric attendance), in offices(to track employees’ login and logout timings), in lockers(to safeguard important files, jewellery, etc). Compared to patterns and passwords, which can be cracked with little effort, fingerprint-based locks are tough to crack as everyone has a unique fingerprint. Even so, one cannot match his/her finger’s fingerprint with another finger.
Components Required
Hardware Requirements
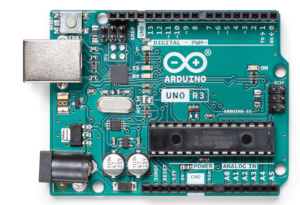
- Arduino Uno : Arduino Uno is a microcontroller from the Arduino Family. It was developed by Arduino. cc and is based on the Microchip ATmega328P microcontroller. Uno has 20 I/O pins, of which 6 are analog and 14 are digital pins.
For more details, pinout and datasheet, you can visit : https://docs.arduino.cc/hardware/uno-rev3
- Relay: used to operate AC devices like light, fan, etc. it is basically a switch. It works on the principle of electromagnetism. It takes DC power as input and gives out AC power.
- Solenoid lock: the solenoid lock is used to lock and unlock through electrical power.
- Buzzer: An Audio Signalling Device. Buzzers can be mechanical, electromechanical, or piezoelectric. It produces an alarming sound when triggered. Used in various applications like a Game buzzer, Alarm Buzzers, Trains, etc.
- LCD: LCD (Liquid Crystal Display) is a type of flat panel display used to print values.
- Fingerprint sensor: used to sense and detect the fingerprint
- LED: light emitting diode(led) is an electronic component that emits light.
- GSM module: global system for mobile communication (GSM) module is used to send and receive data/messages.
Software Requirements
- Arduino Ide : Arduino IDE (Integrated development environment) is software that is used to dump the program into boards. Arduino- IDE’s major use is to build electronics-related projects. Arduino is an open-source platform simple and easy-to-understand platform for coding.
HOW TO INSTALL ARDUINO IDE CLICK ON THE LINK :
https://techieyantechnologies.com/2022/10/installation-of-arduino-ide/
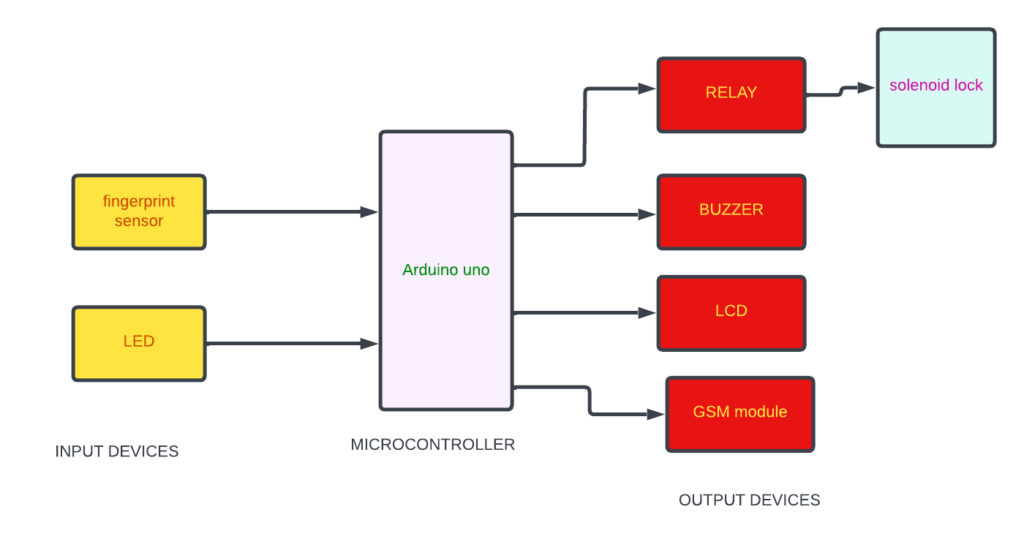
Block diagram
In the following block diagram fingerprint sensor and LED are the input devices. The relay, solenoid lock, GSM module, LCD, and buzzer are the output devices. Arduino Uno is the microcontroller.
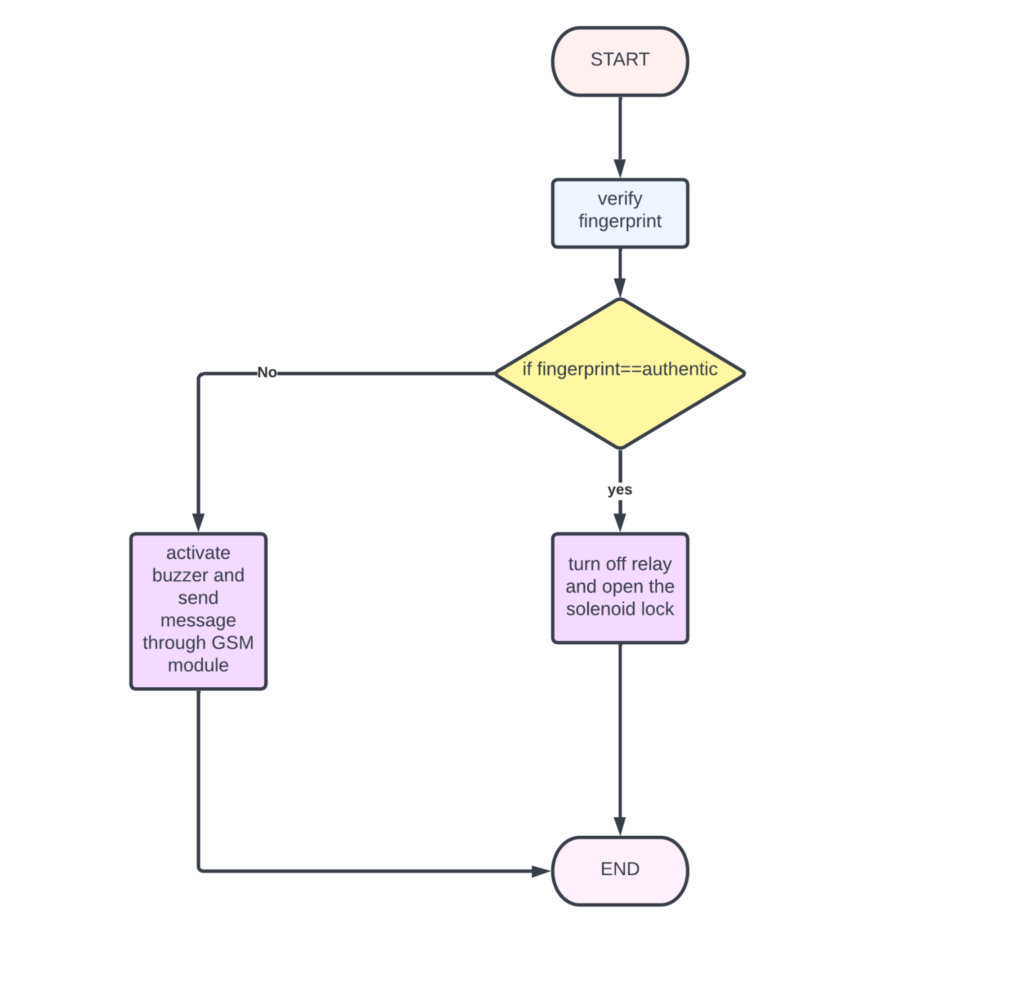
Flow Chart
Once the finger is placed on the fingerprint sensor, the fingerprint is verified. If the fingerprint is authentic then the solenoid lock will be opened with the help of a relay. If the fingerprint is not authentic then the buzzer will be activated and an alert message will be sent to the user.
pulse sensor
*website used to make Flow Chart and Block Diagram : https://www.lucidchart.com/pages/
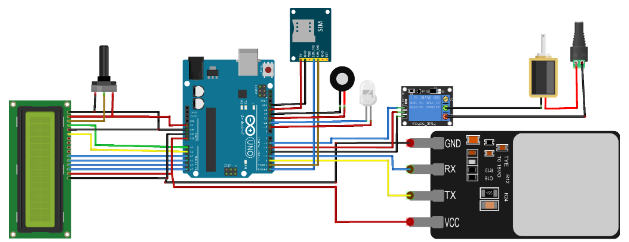
Pin Wiring
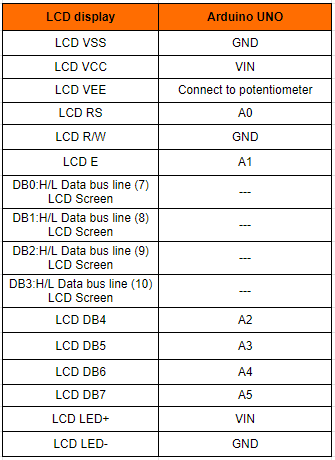
LCD
The LCD display has 16 pins. VSS is connected to the GND of the Arduino Uno.VCC is connected to the VIN of the Arduino Uno.VEE is connected to the potentiometer of the Arduino Uno.RS is connected to the 13th pin of the Arduino Uno.R/W is connected to the GND of the Arduino Uno. E is connected to the A1 pin of the Arduino Uno.DB4is connected to the A2 pin of the Arduino Uno.DB5 is connected to the A3pin of the Arduino Uno.DB6 is connected toA4 of the Arduino Uno.DB7 is connected toA5 of the Arduino Uno.LED+ve is connected to the Vin of the Arduino Uno. LED-ve has connected to GND of the Arduino Uno
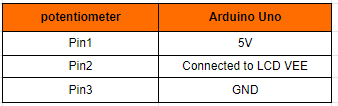
Potentiometer
Pin1 of the potentiometer is connected to 5v of the Arduino. Pin2 of the potentiometer is connected to the LCD VEE pin of the LCD. pin3 is connected to the GND of the Arduino.
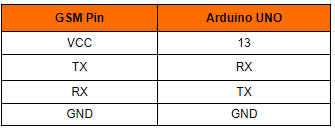
GSM
The VCC pin of the GSM module is connected to the 13th pin of the Arduino. The TX pin of the GSM module is connected to the RX pin of the Arduino. The RX pin of the GSM module is connected to the TX pin of the Arduino. The GND pin of the GSM module is connected to the GND pin of the Arduino.
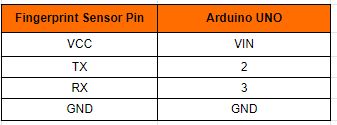
Fingerprint Sensor
The VCC pin of the fingerprint sensor is connected to the VIN pin of the Arduino. The TX pin of the fingerprint sensor is connected to the 2nd pin of the Arduino. The RX pin of the fingerprint sensor is connected to the 3rd pin of the Arduino. The GND pin of the fingerprint sensor is connected to the GND pin of the Arduino.
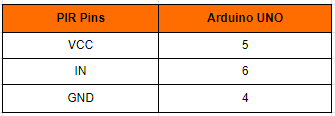
Relay
The VCC pin of the relay is connected to the 5th pin of the Arduino. The IN pin of the relay is connected to the 6th pin of the Arduino. The GND pin of the relay is connected to the 4th pin of the Arduino.
Circuit diagram
Note: make sure to take proper precautions while connecting the components.
Working
The led will be glown if the fingerprint is authentic and the door will be unlocked. The door remains closed if the fingerprint is not authentic and with the help of the GSM module a message will be sent to the user.
Conclusion
We successfully built a biometric security system. In this project, fingerprints are used as a biometric. To make it more complex and secure, biometrics other than fingerprints like faces, gestures, etc can be used.
Working Code
#include <Wire.h>
#include <LiquidCrystal_I2C.h>

LiquidCrystal_I2C lcd(0x27,16,2);                                             // set the LCD address to 0x27 for a 16 chars and 2 line display
int GreenledPin = 13;                                                         // choose the pin for the LED
int RedledPin = 12;                                                           // choose the pin for the LED
int input4Pin = 6;                                                            //push buttons are connected to 6
int input3Pin = 5;                                                            // 5
int input2Pin = 4;                                                            // 4
int input1Pin = 3;                                                            //3 of arduino uno
int buzzer= 11;                                                               //buzzer is connected to pin 11 of arduino uno

int i;                                                                         // integer i is to store the values

#include <Adafruit_Fingerprint.h>


#if (defined(AVR) || defined(ESP8266)) && !defined(AVR_ATmega2560)

SoftwareSerial mySerial(A1,A0);

#else
// On Leonardo/M0/etc, others with hardware serial, use hardware serial!
// #0 is green wire, #1 is white
#define mySerial Serial1

#endif


Adafruit_Fingerprint finger = Adafruit_Fingerprint(&mySerial);


void setup()
{lcd.init();                                                              //initialize the lcd
 // Print a message to the LCD.
lcd.setCursor(2,0);                                                      //Set cursor to character 2 on line 0

lcd.backlight();
lcd.print("welcome to"); lcd.setCursor(2,1);                             //Move cursor to character 2 on line 1
lcd.print(" voting");
  Serial.begin(9600);

pinMode(buzzer, OUTPUT);
  pinMode(2, OUTPUT);
  pinMode(GreenledPin, OUTPUT);                                     // declare LED as output
  pinMode(RedledPin, OUTPUT);                                       // declare LED as output
  pinMode(input4Pin, INPUT);                                        // declare push button inputs
  pinMode(input3Pin, INPUT);
  pinMode(input2Pin, INPUT);
  pinMode(input1Pin, INPUT);

while (!Serial);                                                    // For Yun/Leo/Micro/Zero/...
  delay(100);
  Serial.println("\n\nAdafruit finger detect test");                // set the data rate for the sensor serial port

  finger.begin(57600);
  delay(5);
  if (finger.verifyPassword()) {

    Serial.println("Found fingerprint sensor!");
  } else {

    Serial.println("Did not find fingerprint sensor :(");
    while (1) { delay(1); }
  }

  Serial.println(F("Reading sensor parameters"));
  finger.getParameters();
  Serial.print(F("Status: 0x")); Serial.println(finger.status_reg, HEX);
  Serial.print(F("Sys ID: 0x")); Serial.println(finger.system_id, HEX);
  Serial.print(F("Capacity: ")); Serial.println(finger.capacity);
  Serial.print(F("Security level: ")); Serial.println(finger.security_level);
  Serial.print(F("Device address: ")); Serial.println(finger.device_addr, HEX);
  Serial.print(F("Packet len: ")); Serial.println(finger.packet_len);
  Serial.print(F("Baud rate: ")); Serial.println(finger.baud_rate);

  finger.getTemplateCount();

  if (finger.templateCount == 0) {
    Serial.print("Sensor doesn't contain any fingerprint data. Please run the 'enroll' example.");
  }
  else {
    Serial.println("Waiting for valid finger...");
      Serial.print("Sensor contains "); Serial.print(finger.templateCount); Serial.println(" templates");
  }
}


void loop()
{
 while (getFingerprintID())

  {
  for( i=3 ; i<=6 ; i++)
    checkPush (i);
  }

}

void checkPush(int pinNumber)
{
  int pushed = digitalRead(pinNumber);                                    // read input value
  if (pushed ==HIGH)                                                      // check if the input is HIGH (button released)
   {
    digitalWrite(GreenledPin, HIGH);                                      //turn LED ON
    digitalWrite(RedledPin, HIGH);                                        //turn LED ON
    Serial.print(pinNumber);
    Serial.println(pinNumber);


   if( i==3  )
  {
     lcd.clear();
  lcd.setCursor(0,0);
  lcd.print("A");
  }


if( i==4  )
  {
     lcd.clear();
  lcd.setCursor(0,0);
  lcd.print("B");
  }


if( i==5  )
  {
    lcd.clear();
  lcd.setCursor(0,0);
  lcd.print("C");
  }


if( i==6  )
  {
    lcd.clear();
  lcd.setCursor(0,0);
  lcd.print("D");
   }
  delay(1000);
  lcd.clear();
  digitalWrite(2,HIGH);
   }
  else
    digitalWrite(GreenledPin , LOW);                        //  turn LED OFF
    digitalWrite(RedledPin, LOW);                           //  turn LED OFF

}

uint8_t getFingerprintID() {
  uint8_t p = finger.getImage();
  switch (p) {
    case FINGERPRINT_OK:
      Serial.println("Image taken");
      break;
    case FINGERPRINT_NOFINGER:
      Serial.println("No finger detected");
      return p;
    case FINGERPRINT_PACKETRECIEVEERR:
      Serial.println("Communication error");
      return p;
    case FINGERPRINT_IMAGEFAIL:
      Serial.println("Imaging error");
      return p;
    default:
      Serial.println("Unknown error");
      return p;
  }

  // OK success!

  p = finger.image2Tz();
  switch (p) {
    case FINGERPRINT_OK:
      Serial.println("Image converted");
      break;
    case FINGERPRINT_IMAGEMESS:
      Serial.println("Image too messy");
      return p;
    case FINGERPRINT_PACKETRECIEVEERR:
      Serial.println("Communication error");
      return p;
    case FINGERPRINT_FEATUREFAIL:
      Serial.println("Could not find fingerprint features");
      return p;
    case FINGERPRINT_INVALIDIMAGE:
      Serial.println("Could not find fingerprint features");
      return p;
    default:
      Serial.println("Unknown error");
      return p;
  }

  // OK converted!
  p = finger.fingerSearch();
  if (p == FINGERPRINT_OK) {
    Serial.println("Found a print match!");
    lcd.clear();
    lcd.setCursor(2,0);
    lcd.print("Found a print match!");
  } else if (p == FINGERPRINT_PACKETRECIEVEERR) {
    Serial.println("Communication error");
    return p;
  } else if (p == FINGERPRINT_NOTFOUND) {
    Serial.println("Did not find a match");
     lcd.clear();
    lcd.setCursor(2,0);
    lcd.print("Did not find");
    lcd.setCursor(2,1);
    lcd.print(" a match");
    tone(11,200);
    delay(500);
    noTone(11);
    delay(500);
    return p;
  } else {
    Serial.println("Unknown error");
    return p;
  }

  // found a match!
  Serial.print("Found ID #"); Serial.print(finger.fingerID);
  Serial.print(" with confidence of "); Serial.println(finger.confidence);

  return finger.fingerID;
}


// returns -1 if failed, otherwise returns ID #
int getFingerprintIDez() {
  uint8_t p = finger.getImage();
  if (p != FINGERPRINT_OK)  return -1;

  p = finger.image2Tz();
  if (p != FINGERPRINT_OK)  return -1;

  p = finger.fingerFastSearch();
  if (p != FINGERPRINT_OK)  return -1;


  // found a match!
  Serial.print("Found ID #"); Serial.print(finger.fingerID);
  Serial.print(" with confidence of "); Serial.println(finger.confidence);
  return finger.fingerID;
}
If You Face Any Issue Feel Free To Contact us Any Time.