
Don’t Break Traffic Rules Automatic Detection of Helmet and Number Plate extraction from videos or images
Abstract
Don’t Break Traffic Rules is basically a small yet massive background application model, which allows the users to detect and even capture the riders riding their vehicle without wearing helmet. So obviously yolo has been used to perform this type of task, since due to its scalability and efficiency it detects the objects in an image or video accurately, since it was manually trained on 1000’s of images to perform this task. Along with yolo we have also used OpenCV and Tkinter gui to build a front-end framework.

Code Description & Execution
Algorithm Description
YOLOv5 is an abbreviation word for You look only once, where this algorithm has shaken most of the developers all around the world in the past 5 years, due to its immense ability to quickly learn and remember any object we have trained or labelled it. There is a unique method to work with yolo models where we require the images to be labelled firstly using specific tools available online or installing it in your local machine. (Labelling software’s links are provided below). the labelling process might take a long time depending upon on your dataset. The images are labelled according to the specification made by the user, whether we’d like to detect multiple objects in an image are single object, depending on it, the text file is created with following parameters,
+ The class of the objects, starting from 0,1, 2.
+ The coordinates of the bounding box drawn.
Reference
- https://machinelearningknowledge.ai/introduction-to-yolov5-object-detection-with-tutorial/
- https://pytorch.org/hub/ultralytics_yolov5/
- https://github.com/ultralytics/yolov5
Sample Label File
The Label file consists of following items.
+ The class of the object
+ Top left coordinate of the bounding box
+ Top right coordinate of the bounding box
+ Bottom left coordinate of the bounding box
+ Bottom right coordinate of the bounding box
How to Execute?
Make sure you have checked the add to path tick boxes while installing python, anaconda.
Refer to this link, if you are just starting and want to know how to install anaconda.
If you already have anaconda and want to check on how to create anaconda environment, refer to this article set up jupyter notebook. You can skip the article if you have knowledge of installing anaconda, setting up environment and installing requirements.txt
- Install the prerequisites/software’s required to execute the code from reading the above blog which is provided in the link above.
- Press windows key and type in anaconda prompt a terminal opens up.
- Before executing the code, we need to create a specific environment which allows us to install the required libraries necessary for our project
- Type conda create -name “env_name”, e.g.: conda create -name project_1
- Type conda activate “env_name, e.g.: conda activate project_1
- After creating an environment, install the required libraries using requirements.txt, i.e., type in pip install -r requirements.txt
- Make sure you are in the correct path in your terminal, where you have saved your executable file/folder. E.g.: cd A:\project\AI\Completed\project_name, then press enter.
- After installing all the libraries, type in “jupyter notebook” you will be redirected to a webpage, there you need to select which file you would like to run, if the file is with .py extension then you can run this in the terminal itself by locating the path where you have saved your executable files and then type main.py
Labelling the images
If you guys ever feel like bored and want to spend your time for something good, you can sit idle and label images, which might really help people around you to do some crazy things. (Whatever I’m saying it is done in python)
Steps to label images.
1. Download the labelimg.zip file from the below link provided.
https://github.com/tzutalin/labelImg
2. Open your anaconda prompt and create a new environment in the location where you have unzipped your labelling files.
3. After that, past the following line of code in your terminal and press enter.
**pyrcc5 -o libs/resources.py resources’**
4. pip install lxml
5. Run python labeling.py, it will open the window, where you can start labelling.
6. Run python labeling.py [image_path_folder] [pre_defined_class_file], here pre_defined_class_file represents the number of classes you need to your data, so you need to change it before starting to label your images, you can find that file in data folder.
7. Make sure to change the format to yolo on the left-hand side, where by default it might be in pascal file format.
8. Finally, click on create bounding box icon and start drawing and make sure to provide class to your bounding box every time you draw a box in an image.
How to run a custom YOLOv5 model in google colab.
- Click on the mentioned official GitHub repository of yolov5 and either fork it or open it in google colab or you can even run it in your local machine by downloading the files if you have a good system specification.
https://github.com/ultralytics/yolov5 - Scroll down and open the file in google colab.
- Make sure your labelled dataset is your drive and ready to be connected with the yolov5 model.
- Run the first cell and see the magic at the left-hand side of the colab screen.
- Click on data folder, double click on coco128.yaml file and replace the path of the dataset with your dataset files saved in the drive and also make sure to change the number of classes, the class names should be in **same order** as you have given while labelling.
- Locate down to training cell and alter the code accordingly, such as number of epochs depending on the accuracy you are getting and also batch size.
!python train.py –img 640 –batch 16 –epochs 3 –data coco128.yaml –weights yolov5s.pt –cache - Finally, the model will be saved in weights folder, which will be created separate folder runs along with the results and evaluation metrics.
Data Description
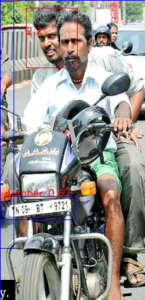
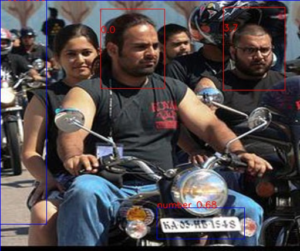
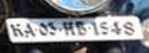
The model has been trained by labelling several images of people riding bikes, the 2 classes which are important for our model is helmet and number plate, so we draw 2 bounding boxes around the person’s helmet and around the number plate if it is visible. the .txt file is then saved along with the image automatically. These files are then loaded on top of our YOLOv5 model which has certain specific rules and steps to be followed to train and save our model. After saving we can load our model in different machine and use it for actual production or to test the model by passing in different images and video files.
Final Result
Issues you may face while executing the code
1. Installing specific face recognition library.
3. We might face an issue while installing specific libraries.
4. Make sure you have the latest version of python, since sometimes it might cause version mismatch.
5. Adding path to environment variables in order to run python files and anaconda environment in code editor, specifically in visual studio code.
6. Make sure to change the path in the code where your dataset/model is saved.
7.AttributeError: Upsample has no attribute ‘recompute_scaler_factor, this error can be solved by locating Upsampling.py file in your anaconda/lib/site_pcakages/torch/nn/modules, got to 154 line and comment out recompute_scale_factor = self.recompute_scale_factor and make sure you have closed the parenthesis. This is the most common issue where everyone has faced.