Abstract
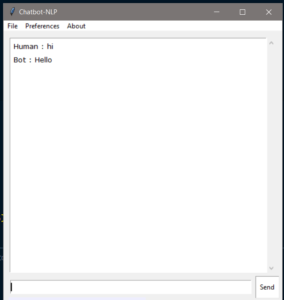
A Conversational Chatbot is a peer-to-peer responsive agent. So, in this project we have used a combination of NLP and Deep Learning to train the agent to answers the questions asked by the user. The tools which we have used are TensorFlow to build the neural networks, nltk to process the text and numpy for manipulating the data and converting it to array, so that we can pass it to our neural network to process the information. Finally, we have integrated entire code with Tkinter GUI where we can have an interface type front end where we can interact with our agent.
Note: You can fully deploy this model to cloud, by training the model with more intents/questions.

Algorithm Description
TFlearn:
TFlearn can be defined as flexible and transparent deep learning aspects which are used in TensorFlow framework and provides us a higher-level application programming interface. It boosts up the experiments which are performed during these tasks. It is very easy to use and easily understandable.

References:
Lancaster Stemmer:
Lancaster Stemmer is the most assertive stemming algorithm. It has an edge over the stemming techniques because it offers us the functionality to add our own custom rules in this algorithm when we implement this using the NLTK package. Sometimes the results of the Conversational Chatbot are unexpected.

References:
How to Execute?
Make sure you have checked the add to path tick boxes while installing python, anaconda.
Refer to this link, if you are just starting and want to know how to install anaconda.
If you already have anaconda and want to check on how to create anaconda environment, refer to this article set up jupyter notebook. You can skip the article if you have knowledge of installing anaconda, setting up environment and installing requirements.txt
- Install the prerequisites/software’s required to execute the Conversational Chatbot code from reading the above blog which is provided in the link above.
- Press windows key and type in anaconda prompt a terminal opens up.
- Before executing the code, we need to create a specific environment which allows us to install the required libraries necessary for our project.
- Type conda create -name “env_name”, e.g.: conda create -name project_1
- Type conda activate “env_name, e.g.: conda activate project_1
- Go to the directory where your requirement.txt file is present.
- cd <>. E.g., If my file is in d drive, then
- d:

7.cd d:\License-Plate-Recognition–main #CHANGE PATH AS PER YOUR PROJECT, THIS IS JUST AN EXAMPLE

8. If your project is in c drive, you can ignore step 5 and go with step 6
9. g., cd C:\Users\Hi\License-Plate-Recognition-main
10. CHANGE PATH AS PER YOUR PROJECT, THIS IS JUST AN EXAMPLE
11. Run pip install -r requirements.txt or conda install requirements.txt (Requirements.txt is a text file consisting of all the necessary libraries required for executing this python file. If it gives any error while installing libraries, you might need to install them individually.)

12. To run .py file make sure you are in the anaconda terminal with the anaconda path being set as your executable file/folder is being saved. Then type python main.pyin the terminal, before running open the main.py and make sure to change the path of the dataset.
13. If you would like to run .ipynb file, Please follow the link to setup and open jupyter notebook, You will be redirected to the local server there you can select which ever .ipynb file you’d like to run and click on it and execute each cell one by one by pressing shift+enter.
14. Before directly running the main.py file make sure you have trained the model with the modified dataset, which you can find in the dataset folder.
- Train the model again to make the chatbot use to the added intents. After training the model, the model will be saved in the model’s folder.
- Now you can run python main.py to load and use the new model.
Please follow the above links on how to install and set up anaconda environment to execute files.
Data Description
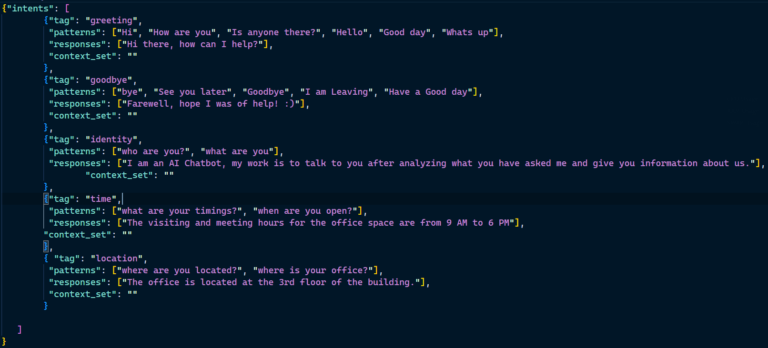
Whenever we are trying to make a chatbot we need to make a list of intents which we wanted our chatbot to follow. The intents consist of Tag, pattern, response and context set. Where tag represents What is the other person trying to ask a chatbot, Example: Greeting, Identification, Goodbye, Food, Sports, Movies etc. Pattern represents what question the person is asking, Response represents the type of response the Conversational Chatbot is willing to give. As this is a simple chatbot the responses are randomly picked from the list of responses for that particular question the person is asking.

Final Results

Issues you may face while executing the code
- We might face an issue while installing specific libraries, in this case, you might need to install the libraires manually. Example: pip install “module_name/library” i.e., pip install pandas
- Make sure you have the latest or specific version of python, since sometimes it might cause version mismatch.
- Adding path to environment variables in order to run python files and anaconda environment in code editor, specifically in any code editor.
- Make sure to change the paths in the code accordingly where your dataset/model is saved.
Refer to the Below links to get more details on installing python and anaconda and how to configure it.
http://techieyantechnologies.com/2022/07/how-to-install-anaconda/
Note:
All the required data has been provided over here. Please feel free to contact me for model weights and if you face any issues.
Click Here For The Source Code And Associated Files.
https://www.linkedin.com/in/abhinay-lingala-5a3ab7205/
Yes, you now have more knowledge than yesterday, Keep Going.
